
Learn how to use the Pipedrive integration so you can import contacts to ZendeskConnect or push contacts to your Pipedrive account.
About the Pipedrive integration
This integration offers two different sync options. One option syncs contacts to your ZendeskConnect account, and the other syncs contacts to Pipedrive with an automation action.
You can choose to use either one or both options with this integration. However, they both function separately from each other.
The inbound sync (sync contacts to ZendeskConnect from Pipedrive) will add the following tags to contacts:
-
pipedrive-integration
-
pipedrive-integration-[pipedrive_filter_name]
The outbound sync (sync contacts to Pipedrive from ZendeskConnect) will not add tags to contacts.
How to sync contacts to ZendeskConnect from Pipedrive (inbound sync)
This option syncs contacts to your ZendeskConnect account from Pipedrive.
Before you get started:
- This integration only syncs fields from Pipedrive to standard and custom contact fields in ZendeskConnect
- You can connect more than one Pipedrive account to your ZendeskConnect account
To configure this integration:
- From your ZendeskConnect account, click "Apps."
- Use the search field to locate the Pipedrive integration.
- Click the Pipedrive option.
- Click the "Import Contacts" button.
- A modal window will appear. Click the "Connect" button.
- The Pipedrive login page will open. Provide your login information and click the "Log in" button.
- A confirmation message will appear. Click the "Continue to the App" button.
- The integration will redirect you to your ZendeskConnect account. Click the "Continue" button.
- Click the "Select Filter" dropdown and click the filter you would like to use for this sync.
- Click the "Continue" button.
- Click the Pipedrive field dropdown and map the Pipedrive email field to the ZendeskConnect email field.
- Optional: To map additional fields, click "Add field mapping." Note that this integration will not create new fields in your account. You must have custom fields created in your ZendeskConnect account before you can map them to fields in Pipedrive.
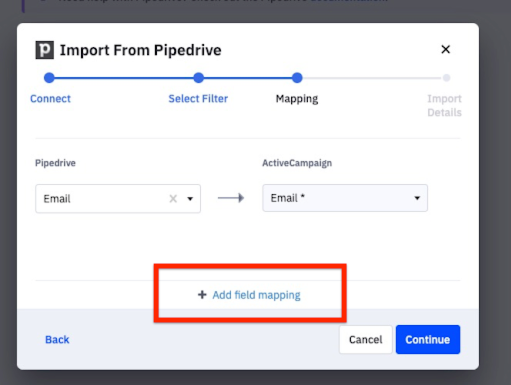
- Click the "Continue" button.
-
Choose the behavior of your import. You can choose from:
-
Import contacts and auto import contacts in the future
You'll want to use this if you wish to sync contacts to ZendeskConnect regularly. Once connected, we'll check for new and updated contacts every 30 minutes. -
Import contacts and do not auto-import contacts in the future
You'll want to use this if you wish to perform a one-time sync of all contacts from Pipedrive.
-
Import contacts and auto import contacts in the future
The integration setup is complete.
How to sync contacts to Pipedrive from ZendeskConnect (outbound sync)
This option uses the "Create and update people in Pipedrive" automation action to sync contact information from ZendeskConnect to Pipedrive.

Once you add this action to your automation, a prompt will walk you through the following connection and configuration steps:
- Connect to a Pipedrive account
- Map ZendeskConnect contact fields with Pipedrive people fields
As contacts move through this action, mapped data will sync to Pipedrive in real-time.
Before you get started:
- Only contacts fields from ZendeskConnect will sync to fields Pipedrive, including standard and custom contact fields
- Only contacts who reach the "Create and update people in Pipedrive" action in your automation will be added or updated in Pipedrive
- You can connect more than one Pipedrive account to your ZendeskConnect account
To add and configure this action in your automation:
- From your automation, click "CX Apps" in the right menu.
- Drag the "Create and update people in Pipedrive" action to your automation.
- A modal window will open. Click the "Connect" button.
- Provide your Pipedrive login credentials and follow instructions to connect Pipedrive with ZendeskConnect.
- You will be directed back to your ZendeskConnect account. The dialog box will show an "Account Connected!" message. Click the "Continue" button.
- Next, map first name, last name, and email fields. Note that both the First and Last names are REQUIRED for the sync to work. Contacts without values for these fields will fail to be synced.
- Optional: Map additional fields. To do so, click "Add Field Mapping" then click the dropdowns to map the desired fields.
- Click the "Finish" button.
The action will appear in your automation.
In addition, Pipedrive will appear on the "Connected Apps" in your ZendeskConnect account.
How to disconnect the integration
You can disconnect your Pipedrive account from ZendeskConnect. Once disconnected, you will no longer be able to sync contact information from ZendeskConnect to Pipedrive. No information will be lost in Pipedrive once the account is disconnected.
- Click "Apps" in the left menu.
- Click "Connected Apps."
- Click the "Pipedrive" app.
- Click the "Disconnect" button.
- A confirmation dialog box will appear. Click the "Disconnect" button.
A confirmation message will appear at the top of the Pipedrive app page.
What to do if the First and Last name fields are not required when mapping fields to Pipedrive
Older Pipedrive accounts may not have the First Name and Last Name Fields in their list of default fields. To check this:
- Click on your account name in the top right of the Pipedrive interface.
- Click "Settings" in the dropdown menu.
- Click "Data Field" on the left, under the "Company" setting.
- Click the "Person" tab.
- Check if the First Name and Last Name fields are in the "Default Fields" or "Custom Fields" list.
If you do not see these fields, you will need to contact the Pipedrive Support team to add them as default fields in your Pipedrive account.
Comments
0 comments
Article is closed for comments.